

The Ultimate Worker Trousers


Make Notes:
Below I've listed the 7 features I changed for this pair of trousers. Without further ado...

1. Lengthening the pattern
I'm 5ft 10 and I wanted to make these trousers suitable for winter while still keeping a turn up. These usually sit a little cropped on me (which I like) but I decided to add an extra 6cm through the length on this pair.
I opened the pattern in 2 places as well as adding to the end length:
- 1cm though the hip
- 3cm through the knee
- 2cm added to the bottom hem
If you'd like to either lengthen or shorten your trouser legs (or sleeves or bodices for that matter) you simply cut through the pattern perpendicular to the grain and open to the required length, sticking a piece of paper underneath to join the gap.
I've zoomed in on the picture below to show you my own lengthening through the knee. This retains the silhouette of the leg - you wouldn't need to do this for a straight leg, you'd just add to the bottom.


2. Coin Pocket
I added a little coin pocket to the front right pocket. You can simply make a tiny patch pocket and then stitch it to the lower pocket bag and facing like so.

3. Welt Pockets
The welt pockets are a new feature for me - before now I have never used them on trousers... madness! I absolutely love the look of welt pockets on trousers and they were really satisfying to sew.
I added additional topstitching around the outside of the pocket bag. This was mostly for decoration but it also helps to strength the whole bag which is very useful.
-
I made up the patterns for these pockets from scratch but they're very standard as far as welts go. You can download the free pattern here and please head to our Instagram story highlights for instructions on sewing them.


4. Extra Leg Pockets
Going in with the cargo pant theme, I added patch pockets to the sides of the legs. I used the patch pocket that comes with the pattern and then I made a custom pocket flap which I fused and lined.
I pinned the pocket to roughly where I thought would work and then held the leg up against myself in the mirror. I positioned it central to the side seam and just above the knee.

5. Wide Belt Loops & Cross at the Back
As this trouser is really playing to the extra details I thought I'd make an extra wide set of belt loops. The finished width of these is 1.5cm and I added 4 rows of topstitching and then did a double bar tack to secure them.


6. Zip Fly
As always I added the binding detail to the fly area. I chose to do a zip fastening on this pair (which is now added to the instructions on the pdf pattern along with the button fly construction).
If you've been following us for a little while you'll know this is trademark feature of mine. I usually try to use a checked fabric on the bias to give this lovely visual effect.
If you'd like to learn how to do this the online workshops for the Worker Trousers and Daphne Trousers will show you how. Note: the Worker workshop shows a button fly construction and the Daphne workshop shows a zip fly construction.
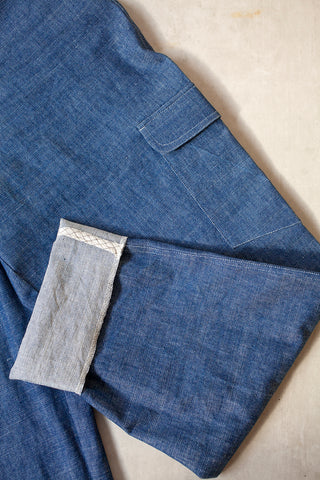
7. Overlocked Hem & Binding at Turn-up
I love the lighter colour of the inside of the fabric with the turn up and I couldn't decide how much to hem by. So in the end I simply overlocked the hem which I actually quite like.
I also added a strip of binding to the outside leg seam to add an extra detail to the turn up. If you'd like to do this detail, apply the binding after you've overlocked the seam and before you apply any topstitching. I recommend trimming any bulk away from around the binding after you've sewn the first line of stitching.
Here I've used a cream colour but it also works really nicely to use a bright colour to add a bit of pop to your ankle.
-
Want to make your own Worker Trousers?

