

Naomi Blazer
PDF Guide
Photo Guides
This page features step-by-step photo guides to support the written PDF instructions for the Naomi Blazer.


Sleeve Rolls

1.
Using a sleeve roll will help smooth the sleeve head and fill out the top of the armscye.
Each sleeve roll will have a centre notch marked and will have a slightly longer side. The longer side always sits at the back of the sleeve.
2.
The sleeve roll will sit right at the top of the sleeve head, attached to the seam allowance on the inside of the sleeve.

3.
Using a sleeve roll will help smooth the sleeve head and fill out the top of the armscye.
To insert the sleeve roll, you will be working from the inside of the blazer and matching the sleeve roll up against the sleeve. Find the centre notch and line that up with the shoulder seam of the blazer.

4.
Pin the centre notch first and work your way round to each end. Make sure you are only pinning to the seam allowance and not accidentally catching the sleeve.

5.
To hand sew the sleeve roll, use a straight stitch at around 0.7cm, making sure to keep to the seam allowance only.

6.
You can keep your stitches relatively wide to allow the sleeve roll to adjust and move with your body when wearing the blazer.

7.
To finish the stitching, do a couple of back stitches to hold in place.

8.
The sleeve roll will now be sitting comfortably in place.
Shoulder Pads

1.
The shoulder pad adds structure and definition to the shoulder.
Each shoulder pad will have a centre notch marked and one side longer than the other. The longer side should sit at the back of the sleeve.
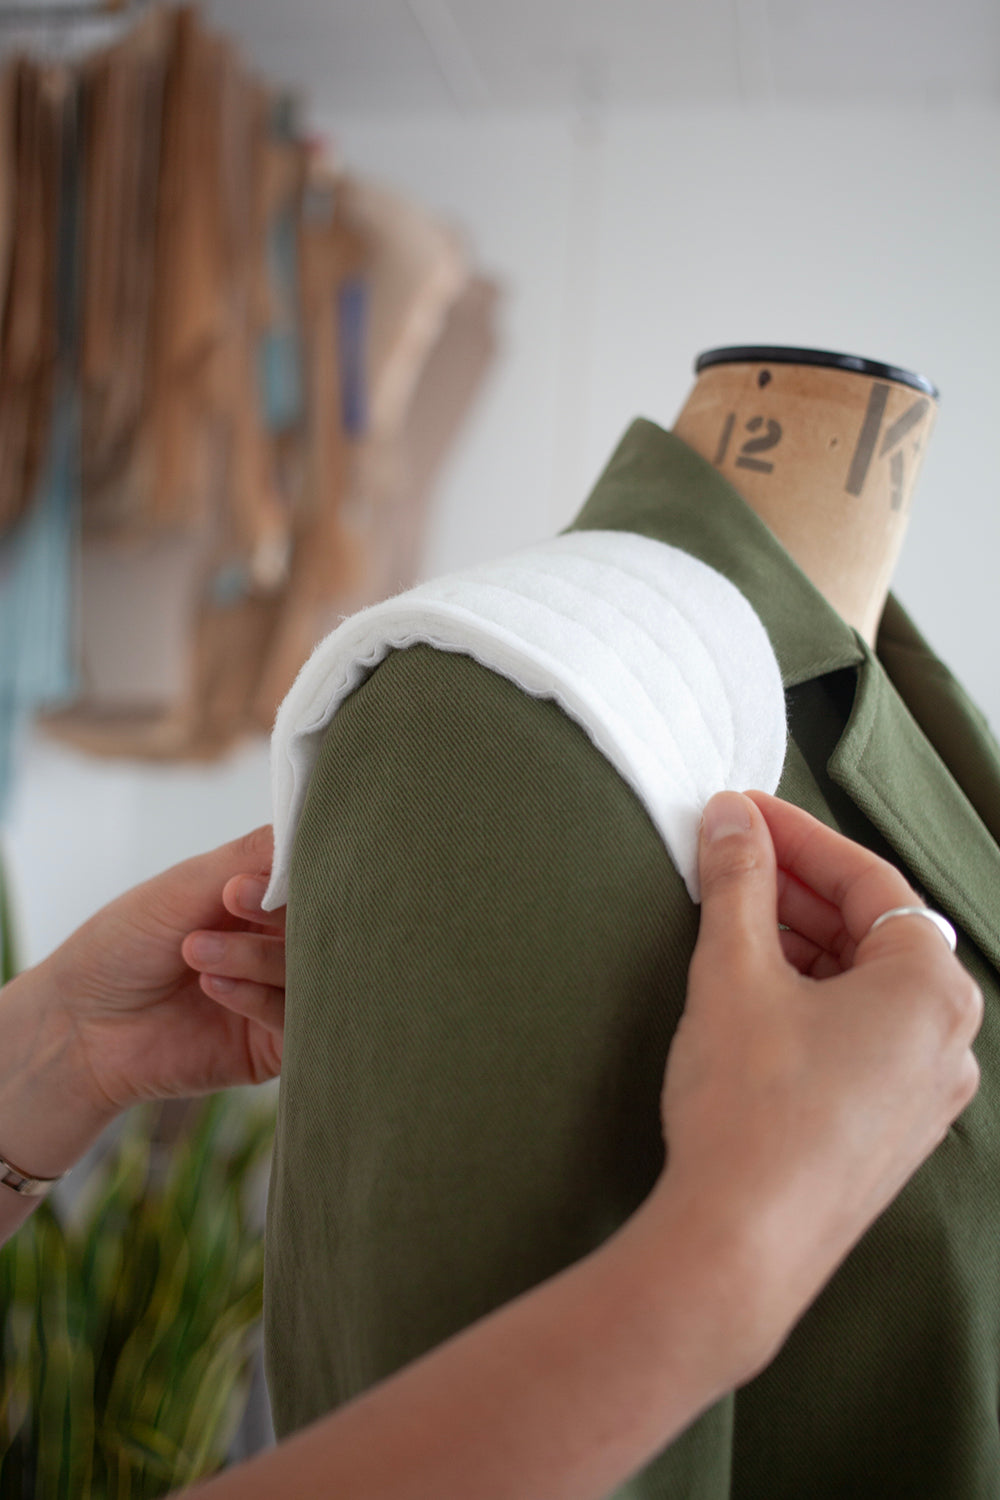
2.
Shoulder pads are made of layers which you can choose to reduce if you wish. The straight side of the shoulder pad will line up with the shoulder seam, and the curved side will sit further up the shoulder.

3.
To attach the shoulder pad, line up the centre notch with the shoulder seam. The pad will be attached on the opposite side of the sleeve roll, lying against the shoulder seam.

4.
Make sure the edge of the shoulder pad is flush against the shoulder seam allowance.

5.
Pin the shoulder pad to the seam allowance, starting with the central notch and working your way out on both sides.
6.
Stitch the shoulder pad into place, making sure to only catch the seam allowance and not the sleeve or shoulder.

7.
You can keep your stitches relatively wide to allow the shoulder pad to adjust and move with your body when wearing the blazer. Finish with a strong back stitch to keep in place.

8.
Where the curved side of the shoulder pad meets the shoulder seam, make a small tack on the seam allowance to keep the shoulder pad from moving around when wearing.
Seam Grading

What is seam grading?
Seam grading reduces bulk and allows for a cleaner and crisper finish when the garment is pressed.
One layer of the seam allowance is trimmed, creating a layered effect. When the garment is turned through it helps the seams lay flatter.

How to Seam Grade
Anywhere where you will find the seam allowance bulky, you can trim one layer of the seam allowance by around 5mm or so. Here we are seam grading the front facing edge.

Collar
We also chose to seam grade around the collar. This image shows the method B option of attaching the collar. If using method A you can seam grade the collar before turning out and attaching to the blazer.

Seam Allowances
It's also very useful to reduce bulk on the seam allowances which can tend to be thicker than others, for example the hem facings. Here you can simply cut away one layer of the seam allowance to remove a small square as shown here.
Alternative Collar Construction

Method B
If you’re using a thick fabric or wool fabric (not including lightweight wool suiting) you might like to construct your blazer by the following method. This construction is useful for distributing bulky seams around the neck and collar to allow for a comfier wear in heavier fabrics. Please note we will not be applying the decorative topstitching when sewing Method B.

1.
Pair your unfused Under Collar (6) with your unfused Collar Stand (7) and your fused Top Collar (5) with your fused Collar Stand.

2.
Lay the collar and stand RIGHT SIDES TOGETHER and pin following the notches.

3.
Stitch this seam closed at 1cm.

4.
You’ll now have a joined collar & stand that is fused and unfused.

5.
Seam grade the collar stand seam allowance to 0.5cm.

6.
Then press both seam allowances flat towards the collar stand.

7.
Match the unfused collar with the main shell.

8.
Match the fused collar with the lining shell.

9.
Lay the unfused collar on the lining shell RIGHT SIDES TOGETHER, match the centre back notch and shoulder notch and pin together.

10.
Line up the end of the collar with the notch on the front neckline.

11.
Repeat this process for the fused collar and main shell.

12.
Stitch the collar down at 1cm on both pieces.

13.
Trim the corner of the seam allowance away to remove a small square as shown.

14.
This will help to reduce any bulky areas on the inside.

14.
Then carefully snip into the front piece where the collar ends. Snip right up to the stitching but not past it.

15.
Then press the seam open and flat, ensuring the section of seam allowance between the snipped section at the end of the collar and the centre front seam remains flat.

16.
Lay the main shell and lining shell RIGHT SIDES TOGETHER.

17.
Pin the whole circumference of the raw edges together.

18.
You’ll need to turn back the left side of the vent at the notch as shown.

19.
Then stitch around the whole circumference at 1cm, starting at one side of the vent and finishing at the other.

20.
As you’re doing this make sure your collar corners are nice and crisp by lifting the foot and swivelling at each corner.

21.
Your blazer will now look like a fully inside out garment.

22.
Mitre every corner carefully so you can point out each corner of the collar, front, hem and vents.
23.
Then trim the unfused seam allowance all the way around the garment to grade the seams. This will help the seam allowance in the thick fabric to lay flat when it’s turned out the right way.

24.
Then carefully snip into the collar corner right at the point where the stitching changes direction. Then remove some of the surrounding seam allowance by tapering into the corner. It’s important to snip right up to the stitching in order for the corner to turn out nicely.

25.
The collar area will look like this, with careful seam grading and the corners mitred.

26.
Now turn the blazer out through the gap left in the lining, then use small scissors to carefully push each corner into a neat point.

27.
Press the whole circumference following the pressing guidance in video 'Pressing and Topstitching'. The collar will also need pressing with a roll to the under collar.

28.
Your collar is now attached and you can move on to step 49 in the PDF instructions.
Vent
1.
Lay the outer shell on the table WRONG SIDE UP. Then lay the lining shell directly on top, with the RIGHT SIDE UP. Now peel the lining from left to right, folding in half at the centre back seam. The vent section will now sit side by side like this with the WRONG SIDE of the lining and main shell facing up.

2.
Pinch the top corner of the main vent, making sure to only hold the top seam allowance, leaving the lower one free.

3.
Pinch this together with the top corner of the lining RIGHT SIDES TOGETHER. Pin into place.

4.
Pin down this edge and when you get to the hem facing let the excess fabric fold down towards the facing to create a pleat.

5.
Pin into place and then stitch down this edge at 1cm.

6.
Next, snip into the corner of the lining by 1cm as indicated. Stitch at 1cm.

7.
Now pull the raw edge of the lining seam to meet the remaining raw edge of the vent keeping the RIGHT SIDES TOGETHER.

8.
Measure 1cm in from the top and side of the vent corner. The end of the snipped corner of the lining should sit exactly at this point.

9.
Pin the raw edges of the lining and vent together and when you get to the hem facing repeat the process of folding the lining to create the pleat. Stitch at 1cm.

10.
To help to reduce any bulky areas on the inside, trim away the seam allowance by the hem facings.

11.
This will make it easier to press and sit flat.

12.
Then press the seam flat.

13.
Repeat clipping the seam allowance on the other side of the vent.

14.
Layer up both vent sides neatly and press. The outer shell should roll over and be slightly visible from the lining side as shown here.

15.
The vent will now be sewn along both long edges with just the top diagonal section remaining free.

16.
To sew this pin the diagonal raw edge of the lining to the seam allowance of the top of the vent.

17.
Clip into the seam allowance, 1cm from the top of the vent to allow the lining to lay flat.

18.
Stitch at 1cm, making sure to start at the previous stitch line.

19.
Finally press that previous line of stitching.